Overview
This article provides the steps to install a NetPrintQueue2Fax(NPQ2F) printer on a client machine where the client and the host machine do not have the same CPU architecture.
Example: Client machine is a 32-Bit machine while the GFI FaxMaker server is running on 64-Bit architecture.
Information
-
Microsoft Windows Vista
- Click on 'Start' and select 'Control Panel.'
- Select 'Add a network, wireless, or Bluetooth printer.'
- If the NetPrintQueue2Fax printer is automatically found by the wizard, proceed to step 5. If the printer has not been found through the automatic search, click on 'The printer that I want isn't listed.'
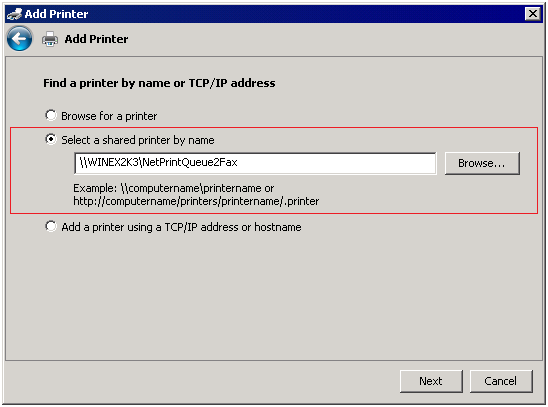
- Click on the option 'Select a shared printer by name' and enter the details of the NetPrintQueue2Fax shared printer through IP address or Hostname of the GFI FaxMaker server.
Example:\\WINEX2K3\NetPrintQueue2Faxor
\\192.168.2.1\NetPrintQueue2Fax
- A dialog will inform the user that the 'NetPrintQueue2Fax' printer does not have the correct printer driver installed. Click 'OK' and then browse to the path containing the drivers located on the GFI FaxMaker server.
- Locate the NetPrintQueue2Fax_Drivers on the GFI FaxMaker server.
- Locate the npqf.inf file in the NetPrintQueue2Fax_Drivers folder.
- Continue with the driver installation, choosing 'Install this software driver anyway' option when prompted.
- At this stage, the NetPrintQueue2Fax printer will be successfully installed.
- The NetPrintQueue2Fax printer should be shown in the Devices and Printers Console.
-
Microsoft Windows 7 or later
- Click on 'Start' and proceed to the 'Control Panel.'
- Click on 'Hardware and Sound' > 'Devices and Printers.'
- Select 'Add a printer.'
- Click on 'Add a network, wireless, or Bluetooth printer.'
- If the NetPrintQueue2Fax printer is automatically found by the wizard, proceed to step 7. If the printer has not been found through the automatic search, click on- The printer that I want isn't listed.
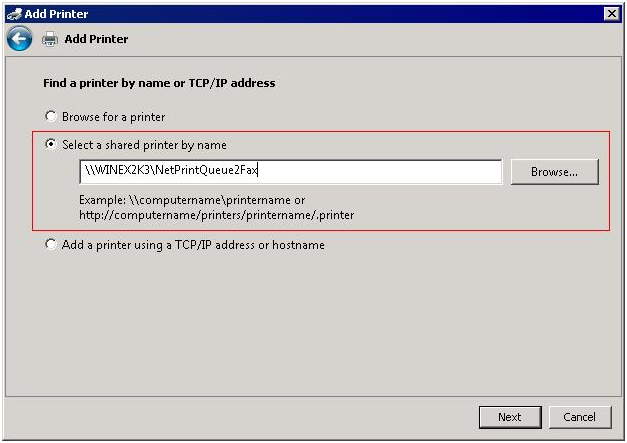
- Click on the option 'Select a shared printer by name' and enter the details of the NetPrintQueue2Fax shared printer through IP address or Hostname of the GFI FaxMaker server.
Example:\\WINEX2K3\NetPrintQueue2Faxor
\\192.168.2.1\NetPrintQueue2Fax
- A dialog will inform the user that no drivers were found for the NetPrintQueue2Fax printer. Click 'OK' and then browse to the path containing the drivers located on the GFI FaxMaker server.
- Locate the 'NetPrintQueue2Fax_Drivers' folder on the GFI FaxMaker server.
- Locate npqf.inf file in the NetPrintQueue2Fax_Drivers folder.
- Continue with the driver installation, choosing 'Install this software driver anyway' option when prompted.
- At this stage, the NetPrintQueue2Fax should be installed successfully.
- The NetPrintQueue2Fax printer should now be shown in the Devices and Printers Console.
Priyanka Bhotika
Comments