Overview
This article shares the process to use the Import/Export tool to extract emails from Microsoft Exchange Mailboxes into the GFI Archiver Archive Stores. The Import/Export tool is useful to migrate emails that were already in the mail system when GFI Archiver was installed, or that those which failed using other means to archive.
Diagnosis
Administrators may find that mail is missing from the Archive Stores and can run an Import using the tool to import missing content. This manually triggered archive request pulls mail from the Exchange store to Archiver storage. This is useful for importing mail when first installing the Archiver product, or when the journal mailbox is down for an extended period of time.
Solution
General Process Flow
Here are the general steps of the process. For a detailed step-by-step guide refer to the next section:
- The Import/Export tool extracts emails from Microsoft Exchange mailboxes.
- The tool converts the emails to MIME (Multipurpose Internet Mail Extensions) format.
- The Import Service processes the extracted emails based on the date of each email.
- GFI Archiver stores emails in the appropriate archive store.
Step-by-Step Process Guide
Follow these steps:
- Verify you have an account in place with the permissions configured as per Setting Permissions for Importing Emails from Microsoft Exchange via Import/Export Tool
-
Importing Emails from a Remote Computer
- Refer to the link above when extracting items from a mailbox on a remote machine. If importing emails from the same machine where GFI Archiver is installed, skip this step.
- Refer to the link above when extracting items from a mailbox on a remote machine. If importing emails from the same machine where GFI Archiver is installed, skip this step.
-
Running the GFI Archiver Import/Export Tool
- Launch the Import/Export tool by going to Start > Programs > GFI Archiver > GFI Archiver Import/Export Tool.
- Click Import from Microsoft Exchange Mailbox.
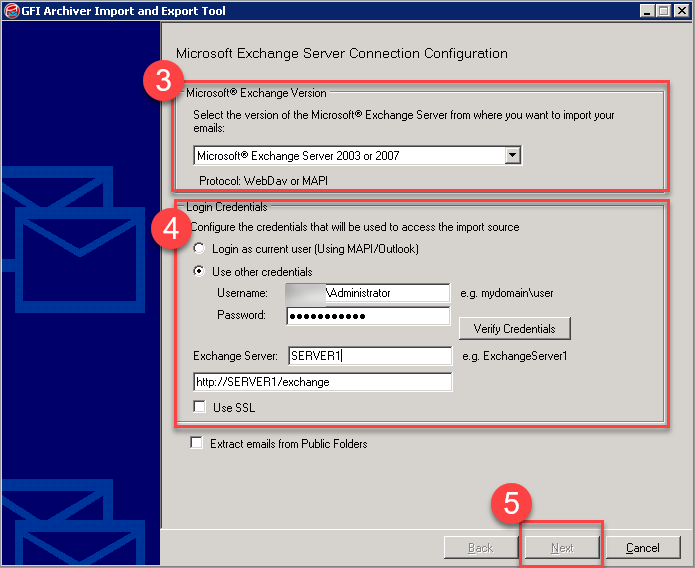
- From the Microsoft Exchange Version area, choose the applicable option based on the Microsoft Exchange version available and the protocol to be used:
Option Description Microsoft Exchange Server
2003 or 2007Choose this option to use WebDAV or MAPI with Microsoft Exchange Server 2007 or earlier.
Microsoft Exchange Server
2007 or 2010 or 2013 or 2016Choose this option to use EWS with any version of Microsoft Exchange.
Microsoft Exchange Server
2013 or 2016 (MAPI/Outlook)Choose this option to use MAPI 2013 with Microsoft Exchange 2013 or 2016.
Microsoft Exchange Online
(Exchange/Office365)Choose this option if you have Microsoft Exchange Online or Microsoft Office 365.
- From the Login Credentials area, configure a user with permissions to access the Microsoft Exchange mailboxes to import:
Option Description Log in as a current user Log in to Microsoft Exchange Server using the credentials of the logged on user.
Use other credentials Specify the username (use the format
domain\username) and password of a user with full mailbox access permissions.Exchange Server Specify the Microsoft Exchange Server name or IP address.
Use SSL Check this option if the Microsoft Exchange Server requires SSL connection.
Extract emails from Public Folders Check this option to extract emails from public folders. Verify Credentials Click this option to confirm access and authentication with Microsoft Exchange Server.
- Click Next to continue.
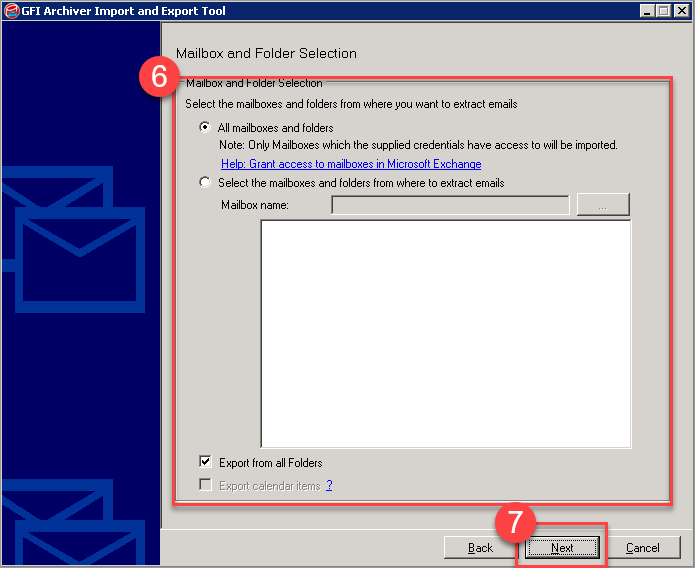
- Choose the mailboxes and folders option as needed to import:
Option Description All mailboxes and folders Import all the emails in mailboxes that the configured user has access to.
Choose the mailboxes and folders from where to extract emails Choose this option to import the emails of a particular mailbox.
Specify the Mailbox name or click the icon with three dots to choose a mailbox to import.
To import emails from a particular folder only, check Import emails from the following folder only and enter the folder’s name.
Export from all Folders Check this option to extract emails from public folders.
Export Calendar Items Check this option to extract historical calendar items from public folders.
Note: The Import/Export tool is recommended only when importing historical calendar items. For current calendar items, it is recommended to use the Archive Assistant.
IMPORTANT: To export Calendar Items you must use the Login as the current user (Using MAPI/Outlook) option.
- Click Next to continue.
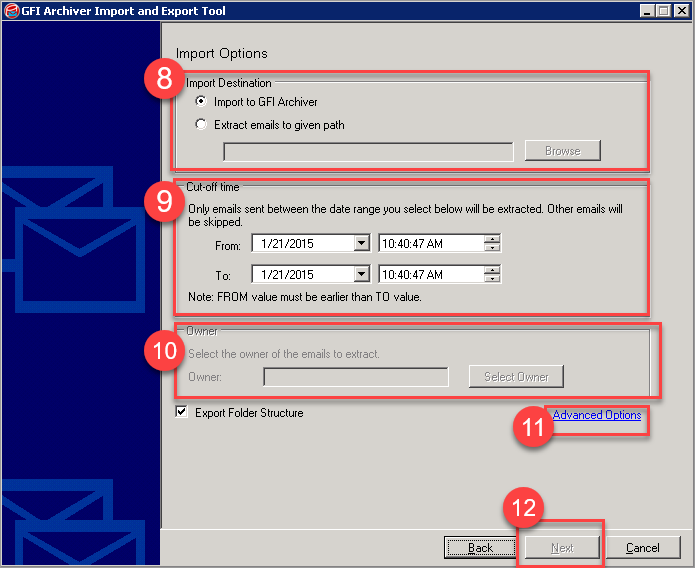
- From Import destination area, choose one of the options:
- Import to GFI Archiver – import emails to GFI Archiver Archive Stores.
- Extract emails to given path – extract emails to a location on disk in .txt format.
- In the Cut-off time area, specify a date range. Emails sent between the specified dates are extracted, while other emails are ignored.
- In the Owner area, enable Choose the owner of the emails to extract and specify the user in the Owner text box.
- For example, if user@testdomain.com is specified in the Owner field, imported emails are displayed under user@testdomain.com.
- For example, if user@testdomain.com is specified in the Owner field, imported emails are displayed under user@testdomain.com.
- (Optional) Click Advanced Options and choose from the different options:
Option Description Ignore already processed flag If checked, the process goes through all emails in the selected date range, irrelevant of whether an export process had already occurred before and exported the same emails.
If unchecked, the process skips already exported emails in the selected date range and resumes with the unprocessed ones.
Do not mark processed emails Choose this option if you want the Import/Export tool to process emails without marking them as processed.
The result is that there will be no flag to ignore when emails are processed again.
Clear email flag prior processing If in a previous export email have already been marked, the flag indicating this process is removed.
- Click Next to start the export process.
- When the process completes, click Finish.
- Note: The duration of the process depends on the number of emails to extract.
- Note: The duration of the process depends on the number of emails to extract.
- Verify if the emails from the Exchange Mailbox migrated successfully.
Testing
After performing an Import of the mails from the Exchange mail stores users should be able to view the imported mail by navigating to the Archiver Console > Archive tab and view mail for users they have access to.
Related Articles
Setting Permissions for Importing Emails from Microsoft Exchange via Import/Export Tool
Setting Permissions for GFI Archiver in Microsoft Office 365 Using EWS
Priyanka Bhotika
Comments