Overview
This article describes how one can move/migrate GFI Archiver to a new server, in a new or existing Active Directory domain while retaining most settings.
Diagnosis
- In this procedure, the server where GFI Archiver was installed will be referred to as Server_Old and the server on which GFI Archiver will be migrated to will be referred to as Server_New.
- The same build of GFI Archiver should be installed on Server_New as was installed on Server_Old. If an upgrade is required, you can upgrade the installation on Server_Old before moving the installation to Server_New, or upgrade after the installation on Server_New is complete using Upgrading GFI Archiver without losing your settings.
- These same instructions can be applied when migrating from a 32bit machine to a 64bit machine. You just need to be sure to use the same path. For example, if the installation path was E:\GFI\Archiver on Server_Old, GFI Archiver should be installed into the same path on Server_New.
Solution
The Migration Process:
- On Server_Old, disable archiving for all journal mailboxes.
- From GFI Archiver web interface > Mail Servers to Archive > Select a journal mailbox and click Deactivate.
- Wait for 5 to 10 minutes to ensure that all items within the GFI Archiver Queue are processed.
- It is recommended to check the following folders and ensure they are empty before proceeding:
- ..\GFI\Archiver\Core\Pickup
- ..\GFI\Archiver\Core\Queue
- ..\GFI\Archiver\MAIS\Pickup
- ..\GFI\Archiver\MAIS\Queue
- It is recommended to check the following folders and ensure they are empty before proceeding:
- Stop all the GFI Archiver services on Server_Old.
- Any new emails that need to be archived will remain in the journal mailbox.
NOTE: If you are moving your SQL databases to the new server this is the time to perform this action following the steps in How to move a GFI Archiver database to another Microsoft SQL Server
- Any new emails that need to be archived will remain in the journal mailbox.
- Locate the GFI Archiver installation directory (default folders from current and previous versions below).
-
Version 12 and newer
- C:\Program Files\GFI\Archiver
-
Version 2015 and older
- 64 Bit - C:\Program Files\GFI\MailArchiver
- 32 Bit - C:\Program Files (x86)\GFI\MailArchiver
-
Version 12 and newer
- Copy the GFI Archiver installation folder from Server_Old to exactly the same path on Server_New.
- For example, if on Server_Old the GFI Archiver folder was located at C:\Program Files\GFI\Archiver’, the installation folder on Server_New should also be located at C:\Program Files\GFI\Archiver.
-
Only if moving from a 32bit to a 64bit operating system: Remove all .EXE and .DLL files from the copied GFI Archiver installation folder on Server_New.
- Extreme caution must be exercised when using the DEL command! If used against the incorrect folder or server it can cause significant damage to Windows and applications:
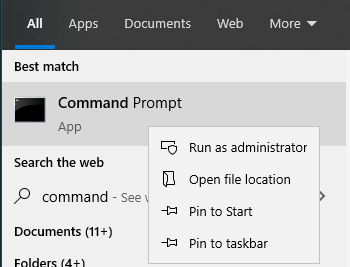
- Open an elevated command prompt on Server_New by navigating to Start, Searching for Command Prompt, right clicking and choose Run as Administrator. Run the following two commands (DO NOT RUN the DEL command unless you are CD'ed into the copied installation folder on Server_New).
- CD /D "C:\Program Files\GFI\Archiver" --- this must reflect the copied installation folder, amend accordingly if needed.
- DEL /S /Q *.EXE *.DLL > del.log. The del.log file gives a record of the files that were deleted and can be used as a list of files to replace or to confirm no extra files were deleted.
- Open an elevated command prompt on Server_New by navigating to Start, Searching for Command Prompt, right clicking and choose Run as Administrator. Run the following two commands (DO NOT RUN the DEL command unless you are CD'ed into the copied installation folder on Server_New).
- Extreme caution must be exercised when using the DEL command! If used against the incorrect folder or server it can cause significant damage to Windows and applications:
- If Firebird databases, Binary files or Indexes have been created in a separate folder than the GFI Archiver installation folder, these need to be copied to Server_New, using exactly the same path used on Server_Old.
- Install GFI Archiver on to Server_New, selecting to install to the directory where the files were copied in step 5.
- When the installation is finished, check the following on Server_New:
- If GFI Archiver is configured to archive to a Microsoft SQL server, ensure the configured Microsoft SQL server is accessible from Server_New.
- Ensure that the paths to any Firebird database, binary files, and Indexing files are configured correctly.
- Check the key <MaxTokenSize> in MArcSettings.xml (**not applicable for GFI Archiver version 2015 and later**).
- This procedure requires to edit files manually. If edited incorrectly it can leave the server in a non-operational state. Please keep backups of any file which is edited throughout this article before saving any changes to them.
- Open the file ..\GFI\Archiver\Core\Data\MArcSettings.xml in notepad.exe on Server_New.
- Search for the key <MaxTokenSize>.
- Ensure that the value is 50.
- Stop/start all GFI Archiver services if the file was edited.
- On Server_New, enable Archiving
- From GFI Archiver web interface > Mail Servers to Archive > Select a journal mailbox and click Activate.
- If on Server_Old you were using EXOLEDB as the connection provider and you are moving to a machine on which Microsoft Exchange is not installed on, use IMAP or EWS to connect to the journal mailbox.
- From GFI Archiver web interface > Mail Servers to Archive > Select a journal mailbox and click Activate.
Points to consider when moving to a server new active directory domain
NOTE: If you are unable to access the configuration follow the steps in How to Reset Roles and Permissions to restore default access to Administrator group
- Review the sections under all configuration pages and ensure that all are configured as desired.
- Archive Restrictions, Access Control, Roles and Permissions.
- Remove the listed entries and reconfigure as needed. This is necessary as user and group objects are different in the new domain.
- Under 'Access Control', configure Shared Mailbox entries to grant the users in the new domain access to their emails that were archived before the domain move.
-
Mail Servers to Archive.
- Update these settings to reflect the changed environment.
-
Mailbox Folder Structure Retrieval.
- Recreate the user and grant him the required permissions for this feature as described in the manual in the new domain and update the settings on this page.
- Archive Restrictions, Access Control, Roles and Permissions.
Testing
After migrating all of the settings and databases launch the console, verify you have connection to the migrated content via the web console by checking historical email. Next, verify that new mail is being pulled from the Journal mailbox by logging in to the Journal mailbox and confirming that mail is continually being removed. If mail is stuck in the mailbox check the settings from step 11 and verify the connection to the mailbox is functional.
Priyanka Bhotika
Comments