Overview
In some cases, the factory-reset of the box does not help in resolving network misconfiguration caused by broken network access. This happens due to configuration mistakes or hardware issues (mostly when migrating from another box).
This article explains how to modify the Kerio Control configuration via serial console using two methods.
NOTE: You need direct access to the Kerio Control box using a serial console. Refer to Connecting to Kerio Hardware Appliances Through a Serial Console for more information.
Process
Method 1
- Connect via serial console to the Kerio Control box.
- Execute the below command:
cd /opt/kerio/winroute
- Make the system read/write by executing the below commands:
mount -o rw,remount /
- Locate the
Interfaces_v2section. It should appear as shown below:
<list name="Interfaces_v2">
- Find the necessary interface and modify the following variables:
<variable name="Mode">Manual</variable>
<variable name="IPAddress">0.0.0.0</variable>
<variable name="Mask">0.0.0.0</variable>
<variable name="AutodetectGateway">0</variable>
<variable name="Gateway">0.0.0.0</variable> - Replace
IPAddress,Mask, andGatewayif needed. -
(Optional) If you need to change a particular traffic rule, edit the following section:
<list name="TrafficRules_v2" identityCounter="112"> -
Save the file and restart Kerio Control by running the following command:
/etc/boxinit.d/60winroute restart
Method 2
- Connect to the Kerio Control Device via console.
- Make the system read/writable:
mount -o rw,remount /
- Navigate to the
/var/winroutefolder:
cd /var/winroute
- Create a new file named
winroute.cfg.testin/var/winroute:
touch winroute.cfg.test
- Have a backup file saved via MyKerio or locally.
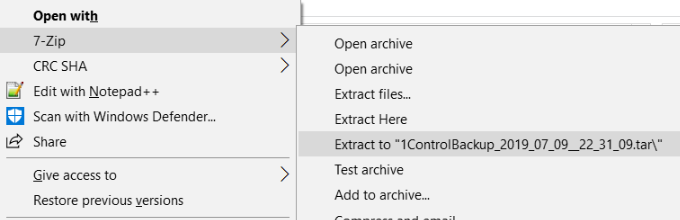
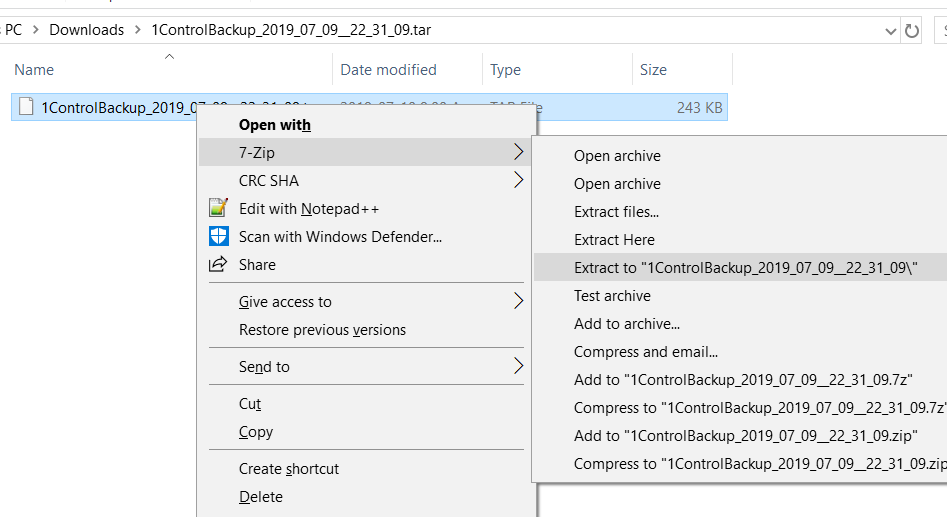
- Unzip .tar.gz to the .tar folder.
- Unzip the .tar file to the ControlBackup folder.
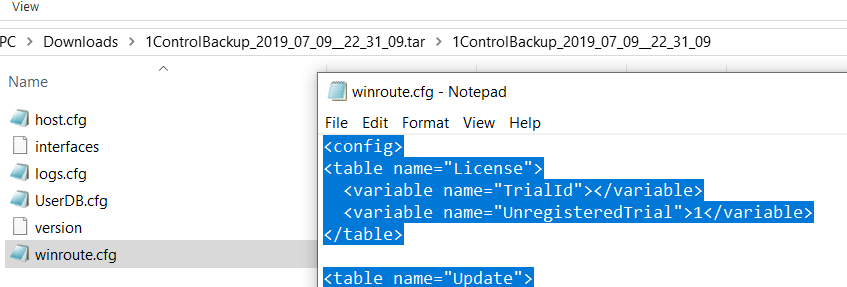
- Open the ControlBackup folder and copy the content of
winroute.cfgand paste it in the new file created (winroute.cfg.test)
For instance:
- Rename the configuration file to
winroute.cfg:mv winroute.cfg.test winroute.cfg
- Restart Kerio Control using the
/etc/boxinit.d/60winroute restartcommand.
Confirmation
The box should be accessible now, and Kerio Control Webadmin loads correctly.
Priyanka Bhotika
Comments